
Swamp Palace
 1st floor
Walk on the tile, use the Hookshot to latch onto the north lever, then pull the lever out from the wall to the maximum, which makes the water level rise. Swim to the right, climb the steps up and continue north. Climb the steps down to the left and take the path west. Swim to the north, then climb the steps up and take the stairs leading to the...
1st basement
Stand on the small raft and use the Hookshot on the post to sail towards it, then use it on the post to the right and open the chest containing some monster guts. Next, hookshot the post to the south, then to the left, to the north, then throw it slightly diagonally at the nearby post to open the second chest to get 20 rupees. Swim towards southeast, then climb the steps up and use the Hookshot on the Small Key to get it! Jump lower and take the path southwest.
 Get rid of the enemy by using the Hookshot to remove its shell and then striking it with the sword. Pick up the shell, climb the steps up to the end, and throw it on the crystal switch, which causes a chest to fall. (If you fail, leave the room and come back.) (If you own the Boomerang, you can simply throw it on the switch standing a little before the top of the steps.) Open the chest to get 300 rupees! Go back north and take the path northeast.
Open the chest to find the Compass, then take the path east. Use the Hookshot on the post to the south to cross, then use it again on the switch to the right, which makes the water level lower in this room. Head north, climb the steps up and get the Small Key. Next, go back in the previous room. Unlock the northern door and go through it.
 Go left and strike the crystal switch to activate it, which changes the direction of the water flow! Go to the other side of the room and use the Hookshot on the switch, which creates a new stream of water to the south of this room and causes the water level to rise. Climb the steps up, turn into a painting, go right and exit near the skulls. Afterwards let yourself into the water, get back to dry land on the left, then use the Hookshot on the west switch, which creates another stream and causes the water level to rise. Climb the steps up and enter the stream to reach the centre of the room. Walk up the stairs to the...
 1st floor
Fight the big jellyfish when it's not electrified, then do the same with the small ones. Next, two doors are unsealed and a warp portal appears. Take the path southwest.
Stand on the floor switch which causes a floor linking the two platforms to appear, then use a bomb or the bomb-enemy to make the cracked floor blow up, and drop through the hole.
 1st basement
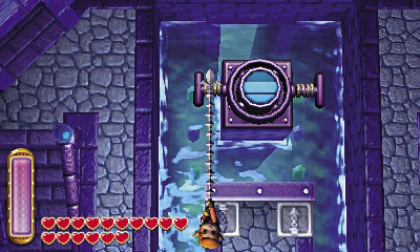
Unlock the southeast door. Move to the centre of the room, stand on the left tile, use the Hookshot to latch onto the machine's left handle and pull it to turn the valve and make the water level go down. (Stand on the right tile if you wish to make the water level rise.) Jump into the water and swim to the northern path.
Keep going, dive under the spiked roller, then open the chest holding the Blue Mail which halves the damage received! Go back south, then swim towards the southwest path.
Walk to the centre, beware the "Beamos", stand on the left tile, then latch onto the lever and pull it to unseal the next door. Take this path northwest.
 1st floor
Start by jumping to the right, then stand on the floor switch to unseal the right door. Swim left, climb the steps up and stand on the left tile. Use the Hookshot on the metal target to the north, then quickly turn into a painting on this target, go left and exit on the other side of the room. Climb the steps up, stand on the right tile, then use the Hookshot on the right handle and pull on it twice to make the water level rise twice. Go onto the raft and open the chest which holds a Small Key! Go back on the platform, stand on the left tile and spin the machine's left handle to make the water level lower. Take the path northeast which brings you back to the second room of the dungeon.
Move on and swim east. Go onto the rafts, merge into the right wall, go left and exit on the other rafts. Open the chest to the south which contains some monster guts. Go back to dry land on the left, use a bomb or the bomb-enemy to make the cracked floor blow up, then drop through the hole.
 1st basement
Unlock the southwest door. Stand on the right tile and grab and pull the right handle twice to make the water level rise twice. Take the path northwest, then walk up the stairs again to return to the...
1st floor
Swim near the rafts and open the chest, finally accessible, which holds a Small Key! Drop through the right hole to go back to the...
1st basement
Take the path southeast, then unlock the southeast door. Jump lower and get rid of the four enemies using the Hookshot to remove their shells and strike them. Doors get unsealed and a stream of water flows to the south. Take the path to the north where you find three small fairies! Put one or two in empty bottles (if available), then go back south. Use the Hookshot on the south post, then walk up the stairs to the...
 1st floor
Swim towards southwest, use the Hookshot on the metal target, then merge quickly with the wall and go left. Stand on the left tile, use the Hookshot to latch to the handle and spin it to make the water level go down. Drop lower and stand on the floor switch to the north which unseals the high door. Next, stand on the southeast tile and spin the right handle to make the water level rise. Swim west, climb the steps up, merge with the target and go back to the platform with the two tiles. This time stand on the right tile and spin the right handle to make the water level rise again. Take the path northwest.
Merge into the wall, go left and exit in front of the skulls. Stand on the hidden switch which lowers the water level, then go left, stand on the left tile and spin the left handle to lower the water level once more. Open the big chest at the centre which holds the Big Key! Climb the steps up and open the boss door...
Argghus
 An old acquaintance for those who played "A Link to the Past"! In a first phase, use the Hookshot on his small eyeballs to attract them to you and then strike them with the sword. Once they are all destroyed, while avoiding the attacks and jumps of the boss, you only have to slash him a great number of times.
Pick up the Heart Container, then take the stairs to the north. Climb the steps up, then touch the portrait. You find yourself in a circular room... The sage who was trapped in this dungeon is Oren, the Zora Queen. Enter the warp portal to come back outside the dungeon.